If you regularly find yourself tossing and turning at the end of a long day instead of getting the life-giving sleep you need, you’ve got to start doing some yoga. Yoga is a natural way to prepare for rest because it relaxes your body and mind.
How Does Yoga Help with Sleep?
Yoga can help you sleep in two ways. Let’s call them ‘Daily Practice’ and ‘Nightly Wind-Down’.
Daily Practice means doing yoga as part of your consistent movement routine. It doesn’t have to be every day but aim for at least three times per week. Including yoga in your physical activities has many benefits if you have trouble sleeping. Regular stretching improves your flexibility and reduces the aches and pains that can keep you up at night. Yoga helps you handle stress by activating your parasympathetic nervous system, which controls your ‘rest and digest’ hormones. Meditation, which is often included in yoga classes, also reduces stress and teaches breath control, which can help induce relaxation. Daily Practice yoga ideally includes some longer sessions of at least an hour and many different kinds of poses.
The Nightly Wind-Down should be less than 15 minutes and consist of poses that help you relax and signal your body that it’s time to rest. Do it as part of your sleep preparation routine every night. These poses keep you close to the floor for grounding energy and move from more active to more stationary postures. Try the following 7 poses and find the combination that works best for you.
Yoga Poses for Better Sleep
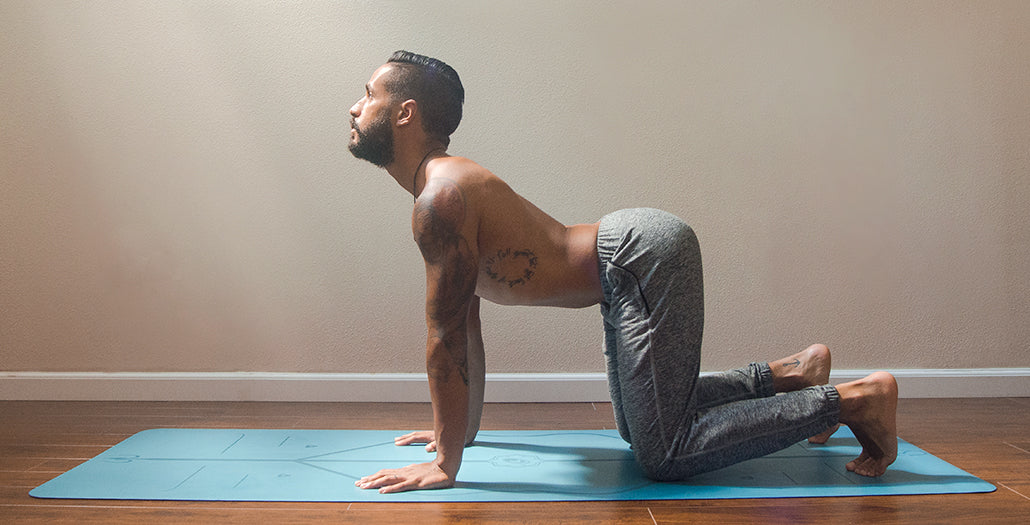
Cat-Cow Stretch (Marjaryasana-Bitilasana)
Sanskrit Meaning: Marjary (Cat) Bitil (Cow)
Yoga Level: Beginner
Pose Type: Kneeling
Benefits: Relaxes the neck and upper back. Integrates breath and movement.
Step-by-Step:
- Come to a hands-and-knees position with your wrists under your shoulders and your knees under your hips.
- On an inhalation, curve your belly toward the floor as you lift your tail and your gaze toward the ceiling.
- On an exhalation, curve your spine toward the ceiling, rounding your back as you tuck your tail and take your gaze toward your navel.
- Repeat this cycle of breath and movement five to ten times.

Child’s Pose (Balasana)
Sanskrit Meaning: Bala (Child)
Pose Type: Kneeling
Benefits: Stretches the shoulders, back, hips, groins, thighs, and feet.
Cautions: Avoid this posture if it causes knee pain.
Step-by-Step:
- Begin in a hands-and-knees position.
- Separate your knees toward either edge of your mat and bring your big toes to touch along the Central Line.
- Sink your hips back toward your heels while continuing to stretch your arms forward.
- Stay here for at least 10 breaths.

Head-to-Knee Pose (Janu Sirsasana)
Sanskrit Meaning: Janu (Knee) Sirsa (Head)
Yoga Level: Beginner
Pose Type: Seated
Benefits: Stretches the hamstrings, calves, hips, and back.
Step-by-Step:
- Come to sit with your legs outstretched in front of you. If it’s hard to sit up straight in this position, take a folded blanket under your seat.
- Bend your left knee and bring the sole of that foot to the inside of your right thigh with the left knee pointing to the left.
- Flex your right foot.
- Inhale to draw your spin long and then exhale to forward bend over your right leg.
- Hold onto your right calf, ankle, or foot to create traction for your stretch.
- After five to ten breaths, switch legs.

Eye of the Needle Pose (Sucirandhrasana)
Sanskrit Meaning: Suci (Needle) Randra (Opening)
Also Known As: Reclined Pigeon
Yoga Level: Beginner
Pose Type: Supine
Benefits: Opens your hips and lower back.
Step-by-Step:
- Lie down on your back with your feet flat on the floor and knees bent toward the ceiling.
- Lift your right foot away from the floor and place your right ankle on the top of your left thigh with your right knee pointing to the right.
- If this feels intense, stay here. If you can stretch more, lift your left foot off the floor.
- Hold your left thigh with both hands and draw it toward your chest. Keep your shoulders on the floor throughout.
- After five to ten breaths, switch legs.

Happy Baby (Ananda Balasana)
Sanskrit Meaning: Ananda (Blissful) Bala (Child)
Yoga Level: Beginner
Pose Type: Supine
Benefits: Stretches the outer thighs, hamstrings, and glutes.
Step-by-Step:
- Lie on your back and hug your knees into your chest.
- Separate your knees to either side of your chest.
- Reach around the outside of each leg and take hold of the soles of your feet or your ankles.
- Flex your feet and stack your ankles over your knees so that the soles of your feet face the ceiling.
- Gently draw your knees toward your armpits.
- Breath here five to ten times.

Supine Spinal Twist (Supta Matsyendrasana)
Sanskrit Meaning: Supta (Reclined) Matsyendra (Lord of the Fishes)
Yoga Level: Beginner
Pose Type: Supine
Benefits: Stretches the hips and back.
Step-by-Step:
- Lie on your back with both legs extended.
- Hug your left knee into your chest.
- Use your hands to move your left knee across your body to the floor on the outside of your right hip.
- Take your gaze over your left shoulder or keep looking straight upwards.
- After five to ten breaths, switch legs.

Legs Up the Wall Pose (Viparita Karani)
Sanskrit Meaning: Viparita (Inversion) Karani (to do)
Pose Type: Inversion
Benefits: Stretches the backs of the legs, improves circulation and lymphatic drainage.
Precautions: Avoid inversions if you have glaucoma
Step-by-Step:
- Come to sit sideways at a wall with your knees bent. One side of your body is in full contact with the wall.
- Roll onto your back, taking your legs up the wall.
- Choose to place your hands on your body or the floor with your palms facing upwards.
- Stay here for several minutes, breathing deeply.
- To come out, bend your knees and roll to one side.

Meditative Breathing
After your Nightly Wind-Down, lie on your back to practice meditative breathing. Focus on your inhales and exhales, how the air feels entering and leaving your body, filling and emptying your lungs. Your mind will undoubtedly wander at times, so just practice brings your attention back to your breath over and over. This technique for separating your awareness from your thoughts is one of the best ways to train yourself to turn off your busy mind when it’s time to rest.